
I am a Zivver admin
Configure and manage Zivver
Office Plugin Installation Manual via Group Policy Objects
Introduction
This guide provides step-by-step instructions for installing the Zivver Office Plugin on Microsoft Windows using Group Policy Objects (GPO). Follow these guidelines to ensure a smooth deployment across your organization.
Minimal technical requirements
System requirements
- Operating System: Microsoft Windows 10 or higher.
- Framework: Microsoft .NET Framework 4.8 or higher.
- Email Client: Microsoft Outlook 2021 or higher.
- Memory Usage: Approximately 150 MB per Outlook session.
Ensure your system meets these requirements to guarantee optimal performance of the Zivver Office Plugin.
Product specific requirements
- An HTTPS connection on port 443 with TLS v1.2 or higher to
https://*.zivver.com. - Microsoft Outlook configured in Cached Exchange Mode1.
- A Microsoft-supported scenario when using different versions of Office, Project, and Visio on the same computer.
1 Zivver adheres to the recommended practices outlined by Microsoft and Citrix for optimal performance with Outlook in Cached Mode. Performance issues encountered in Online Mode will be addressed on a best-effort basis.
GPO specific requirements
- Administrator Rights: You need administrator rights in Microsoft Active Directory (AD) to create and deploy new GPOs, such as being a member of the Domain Administrators group.
 NoteIf you are part of the Group Policy Creator Owners group, you can create and edit GPOs but cannot assign them to AD groups or users.
 - Domain Controller Access: Ensure you have access to a domain controller (DC), either via Remote Desktop Protocol (RDP) or by using the Remote Server Administration Tools.
- ADM File Installation Options:
- Recommended: Access to the
SYSVOLfolder on a DC to install the ADM files in the domain’s GPO Central Store. This ensures the files are replicated across the domain and can be managed from any domain server. - Alternative: If the Central Store is not used, the ADM files can be installed locally on a DC. However, this approach limits the availability of the ADM files to the specific server where they are installed, and they cannot be managed from other domain servers.
- Recommended: Access to the
Download link
Latest MSI installer download link
Installation
This section explains how to install the Office plugin using Group Policy Objects (GPO).
In addition to installing the Office plugin, ensure that you configure the required settings as outlined in the Recommended Office Plugin Settings chapter. These settings are essential for an optimal functionality and user experience.
Share the Office Plugin
To deploy the Office plugin via GPO, ensure it is accessible to users on the network by creating a distribution point on the server. Follow these steps:
- Log in to a domain server with administrator rights.
- Create a new shared network folder or use an existing one.
- Place the Office plugin installer package in this folder.
Download the latest MSI installer - Verify that users have access to the shared folder and adjust permissions if necessary.
The Office plugin is now ready for installation across the domain.
Create a GPO
Follow the steps below to create a new GPO for installing the Office plugin. If you prefer to use an existing GPO, skip this section and proceed to Deploy the Office Plugin.
- Log in to the Domain Controller (DC) with administrator rights.
- Open the Group Policy Management.
For example, use the run commandGPMC.MSC. - Navigate to the domain where you want to apply the GPO.
- Right-click Group Policy Objects.
- Select New to create a new GPO.
- Provide a name for the GPO.
For example: Zivver Office Plugin. - Ensure Source Starter GPO is set to (none).
- Click OK to confirm and create the new GPO.
You can now proceed to Deploy the Office Plugin.
Deploy the Office Plugin
This section explains how to configure the new GPO to deploy the Office plugin. Two deployment methods are available:
- Recommended - Assign the Office Plugin: Automatically installs the Office plugin either on a system level (For-all-users installation) or a user level (Just-for-me installation). The installation occurs during system startup or user login.
- Publish the Offcie Plugin: Makes the Office plugin available for manual installation by users via the Add and remove programs pane in the Control panel. Note that this method is only applicable on a user level and cannot be used for system-level deployment.
Assign the Office plugin
- Right-click the GPO created in the section Create a GPO.
- Select Edit to open the Group Policy Management Editor.
- Choose the deployment level for the Office plugin:
- User: Select User configuration.
- System: Select Computer configuration.
- Expand Policies.
- Expand Software settings.
- Right-click Software installation.
- Choose New > Package....
- Select the installer package from the shared network folder mentioned in Share the Office Plugin.
- Click Open to confirm the selected package.
- Choose Assigned as the deployment method.
- Click OK to confirm.
- Wait for the package to appear in the Software installation pane.
- Right-click the package and select Properties.
- Navigate to the Deployment tab.
- If deploying at the User level, perform the following steps (not applicable for System level):
- Under Deployment options, enable Install this application at logon.
- Under Installation user interface options, select Basic.
- Optional: To hide the Office plugin from the Add and remove programs pane in Control panel, enable Do not display this application in the Add/Remove Programs control panel under Deployment options.
- Optional: To automatically uninstall the Office plugin when the user or system is no longer linked to this GPO, enable Uninstall this application when it falls out of the scope of management under Deployment options.
- Click OK to save changes and close the Properties window.
- Close the Group Policy Management Editor.
The GPO is now configured to assign the Office plugin. Proceed to Link the GPO to apply the GPO to users or computers. Skip the section Publish the Office Plugin.
Publish the Office Plugin
Follow the steps in this section if you chose not to assign the Office plugin.
- Right-click the GPO created in the section Create a GPO.
- Select Edit to open the Group Policy Management Editor.
- Since a package can only be published at the user level, choose User configuration.
- Expand Policies.
- Expand Software settings.
- Right-click Software installation.
- Select New > Package....
- Browse to the shared network folder specified in Share the Office Plugin and select the installer package.
- Click Open to confirm your selection.
- Choose Published as the deployment method.
- Click OK to confirm.
- Wait for the package to appear in the Software installation pane.
- Right-click the package and select Properties.
- Navigate to the Deployment tab.
- Under Deployment options, disable Auto-install this application by file extension activation, as this setting is not applicable to the Office plugin.
- Under Installation user interface options, select Basic.
- Optional: To automatically uninstall the Office plugin when the user is no longer linked to this GPO, enable Uninstall this application when it falls out of the scope of management under Deployment options.
- Click OK to save changes and close the Properties window.
- Close the Group Policy Management Editor.
The GPO is now configured to publish the Office plugin. Proceed to Link the GPO to apply the GPO to users or computers.
Link the GPO to AD objects
This section explains how to link the GPO to a domain or specific Organizational Units (OUs), ensuring the Office plugin is deployed to the AD users or computers within that domain or OU.
- If you assign the Office plugin at the System level, ensure the GPO is linked to an OU containing Computer objects. Verify this by checking the contents of the linked OU in the AD.
- If you assign or publish the Office plugin at the User level, ensure the GPO is linked to an OU containing User objects. Verify this by chekcing the contents of the linked OU in the AD.
- Open the Group Policy Management.
- Right-click the domain or OU where you want to deploy the Office plugin.
- Select Link an Existing GPO….
- Choose the GPO you created in the previous sections.
- Click OK to confirm.
If you chose to assign the Office plugin, the Office plugin will be installed automatically based on the deployment level:
- Assigning at the System level installs the Office plugin during system restart.
- Assigning at the User level installs the Office plugin during user login.
If you chose to publish the Office plugin, the Office plugin will be available for users to install manually from the Add and remove programs pane in the Control panel.
Test the installation
This section explains how to verify if the Office plugin installation was successful.
- Apply the new GPO to the specified domain or OU:
- Open Group Policy Management, for example, by running the command
GPMC.MSC. - Right-click the OU linked to the GPO.
- Select Group Policy Update….
- The GPO will now be updated for AD objects in this OU.
- Verify the Office plugin installation for an AD object linked to the GPO:
- Assigning at the System level installs the Office plugin during system restart.
- Assigning at the User level installs the Office plugin during user login.
- Publishing makes the Office plugin available for users to install manually from the Add and remove programs pane in the Control panel.
Recommended Office Plugin settings
This section provides guidance on installing and configuring the recommended settings for the Zivver Office Plugin. These settings can be applied via a Group Policy Object (GPO) within an Active Directory (AD) domain or configured locally on standalone systems without AD.
To configure these settings in a GPO, you will need the following ADMX and ADML files:
Install the ADM files
You can install the ADM files using one of the following methods:
- Recommended - Central Store Installment
This method ensures the ADM files are replicated across all servers within the domain, allowing consistent deployment of Office plugin settings. - Local Domain Server Installment
This method installs the ADM files on a specific domain server, enabling deployment of Office plugin settings. However, unlike the Central Store installment, the files are not automatically replicated to other servers. - Standalone System (Without AD) Installment
This method is suitable for standalone systems, allowing you to configure Office plugin settings without manually editing the registry.
Central store installment
- Log in to one of your Domain Controllers (DC) with administrator rights.
- Open File Explorer.
- Navigate to the Central Store in the SYSVOL share:
%LogonServer%\SYSVOL\%UserDnsDomain%\Policies\PolicyDefinitions.
For example:\\Zivver_Server\SYSVOL\Zivver.local\Policies\PolicyDefinitions. - Copy the ADMX file to the folder
%LogonServer%\SYSVOL\%UserDnsDomain%\Policies\PolicyDefinitions. - Copy the ADML file to the folder
%LogonServer%\SYSVOL\%UserDnsDomain%\Policies\PolicyDefinitions\en-US.
The ADM files are now installed in the Central Store and will appear as Zivver Office Plugin Settings under Policies > Administrative Templates in the Group Policy Management Editor.
Local domain server installment
- Log in to a domain server with administrator rights.
- Open File Explorer.
- Navigate to the following folder:
%WinDir%\PolicyDefinitions.
For example:C:\Windows\PolicyDefinitions. - Copy the ADMX file to
%WinDir%\PolicyDefinitions. - Copy the ADML file to
%WinDir%\PolicyDefinitions\en-US.
The ADM files are now installed locally and should appear as Zivver Office Plugin Settings under Policies > Administrative Templates in the Group Policy Management Editor.
Standalone system (Without AD) Installment
- Log in to the system with administrator rights.
- Open File Explorer.
- Navigate to the following folder:
%WinDir%\PolicyDefinitions.
For example:C:\Windows\PolicyDefinitions. - Copy the ADMX file to
%WinDir%\PolicyDefinitions. - Copy the ADML file to
%WinDir%\PolicyDefinitions\en-US.
The ADM files are now installed locally and should appear as Zivver Office Plugin Settings under Policies > Administrative Templates in the Group Policy Management Editor.
Create a new GPO
This section explains how to create a new GPO for deploying the Office plugin settings. If you are configuring settings on a standalone computer or using an existing GPO, skip this section and proceed to Configure the Recommended Office Plugin Settings.
- Log in to the Domain Controller (DC) with administrator rights.
- Open Group Policy Management.
For example, use the run commandGPMC.MSC. - Expand the folder for the domain where you want to apply the GPO.
- Right-click Group Policy Objects.
- Select New to create a new GPO.
- Provide a name for the GPO.
For example: Recommended Zivver Office plugin settings. - Ensure Source Starter GPO is set to (none).
- Click OK to confirm and create the new GPO.
Configure the recommended Office Plugin settings
- Right-click the GPO created in the section Create a New GPO or select an existing GPO.
- Click Edit to open the Group Policy Management Editor. NoteIf you are configuring these settings on a standalone computer, open Local Group Policy Editor instead by running the command
GPEDIT.MSC. - Choose to apply the settings at the User level (recommended).
- Expand the folder Policies.
- Expand the folder Administrative Templates.
- Expand the folder Zivver Office Plugin Settings.
- Configure the following settings:
- Expand the folder Additional settings.
- Set Do not show tutorials to new users to Enabled.
- Expand the folder Load Behavior.
- Select the folder AddinList.
- Set Prevent users from disabling the plugin in Outlook to Enabled for your version of Outlook.
- Select the folder DoNotDisableAddinList.
- Set Prevent Outlook from disabling the plugin to Enabled for your version of Outlook.
- Expand the folder Single Sign-On.
- Set Automatically add existing SSO accounts in the plugin to Enabled.
- Set Automatically log in users via SSO to Enabled.
- Set Extend active SSO session duration to Enabled and configure the Session duration in hours to 720.
A session duration of 720 hours ensures users remain logged in to Zivver on shared workspaces for approximately one month. This setting only affects the Office plugin and does not impact session durations for other clients.
- Close the Group Policy Management Editor.
The GPO with the recommended Office plugin settings is now ready to be assigned.
If you configured the settings on a standalone system, skip the next section Assign the GPO, as the settings are applied locally.
Assign the GPO
This section explains how to deploy the GPO to a domain or a specific Organizational Unit (OU), ensuring the settings are applied to the Active Directory (AD) users or computers within that domain or OU.
- If you assign the Office plugin at the System level, ensure the GPO is linked to an OU containing Computer objects. Verify this by reviewing the contents of the linked OU in the AD.
- If you assign or publish the Office plugin at the User level, ensure the GPO is linked to an OU containing User objects. Verify this by reviewing the contents of the linked OU in the AD.
- Open the Group Policy Management.
- Right-click the domain or OU where you want to apply the settings.
- Select Link an Existing GPO….
- Choose the GPO you created in Create a New GPO.
- Click OK to confirm.
The settings will now be applied to the linked AD objects during the next system restart.
Test the recommended Office Plugin settings
This section explains how to verify that the recommended Office plugin settings have been successfully deployed.
Apply the new GPO to the specified domain or Organizational Unit (OU):
- Open Group Policy Management, for example, by running the command
GPMC.MSC. - Right-click the OU linked to the GPO.
- Select Group Policy Update….
- The GPO will now be updated for all Active Directory (AD) objects in this OU.
- Open Group Policy Management, for example, by running the command
Confirm that the recommended Office plugin settings are applied successfully by verifying the following:
- The Zivver tab is visible in the top ribbon of Microsoft Outlook.
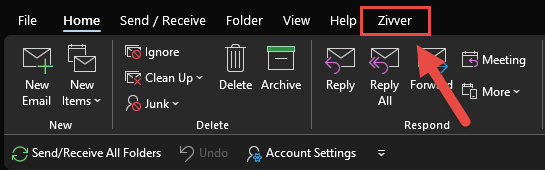
- Users are unable to disable the Office plugin via File > Options > Addins > Manage: COM-addins > Go....
- The Zivver tab is visible in the top ribbon of Microsoft Outlook.
Update the Office Plugin
This section explains how to update the Office plugin to a newer version.
- Open Group Policy Management, for example, by running the command
GPMC.MSC. - Navigate to Group Policy Objects, then right-click the GPO associated with the Office plugin.
- Select Edit... to open the Group Policy Management Editor.
- Choose either Computer configuration or User configuration, depending on your deployment preference.
- Go to Policies > Software settings > Software installation.
- Right-click Software installation and select New > Package....
- Browse to and select the new version of the Office plugin installer.
Download the latest MSI installer - Choose the appropriate Deployment method: either Published or Assigned, based on your original deployment method in the Deploy the Office Plugin section.
- Click OK to confirm the deployment method.
- Right-click the newly added Office plugin installer package.
- Select Properties.
- Navigate to the Upgrades tab.
- Click Add....
- Select Current Group Policy Object (GPO).
- Under Package to upgrade, choose the old version of the Office plugin.
- Enable the option Package can upgrade over the existing package.
- Click OK to confirm and close the Upgrade package window.
- Click OK to save changes and close the Office plugin properties window.
- Close the Group Policy Management Editor.
- Exit Group Policy Management.
The new version of the Office plugin will now replace the existing version during the next system restart or user login, depending on the deployment level.
Uninstall the Office Plugin
This section explains how to uninstall the Office plugin and remove the recommended Office plugin settings.
- Open Group Policy Management, for example, by running the command
GPMC.MSC. - Under Group Policy Objects, right-click the GPO associated with the Office plugin. NoteIf you want to uninstall the Office plugin for only a subset of systems or users, create a new (separate) GPO for this purpose.
- Select Edit... to open the Group Policy Management Editor.
- Choose either Computer configuration or User configuration, depending on your deployment preference.
- Navigate to Policies > Software settings > Software installation.
- Right-click Software installation and select Properties.
- Go to the Advanced tab.
- Enable the option Uninstall this application when it falls out of the scope of management.
- Click OK to save the changes.
- In the right pane, right-click the Office plugin package.
- Select All tasks > Remove....
- Choose Immediately uninstall the software from users and computers as the removal option.
- Click OK to confirm.
- Close the Group Policy Management Editor.
- Exit Group Policy Management.
- Optional: If you created a new GPO for the uninstallation in step 2, ensure you link this policy to the desired users or computers. Additionally, unlink the existing GPO used for the Office plugin installation from the same users or computers to avoid conflicts, as these policies may cancel each other out during restarts.
The Office plugin will be uninstalled after the affected computers are restarted.
Remove recommended Office Plugin settings
- Open Group Policy Management.
For example, by running the commandGPMC.MSC. NoteIf you are configuring these settings on a standalone computer, open Local Group Policy Editor instead by running the commandGPEDIT.MSCand continue from step 4. - Under Group Policy Objects, right-click the GPO containing the additional settings.
- Select Edit... to open the Group Policy Management Editor.
- Choose either Computer configuration or User configuration, depending on whether the settings were applied at the system or user level.
- Expand Policies.
- Expand Administrative Templates.
- Expand Zivver Office Plugin Settings.
- Set all configured settings back to Disabled.
- Close the Group Policy Management Editor. NoteIf the settings were only configured on a standalone computer, close the Local Group Policy Editor and skip the remaining steps.
- Right-click the Organizational Unit (OU) linked to the GPO.
- Select Group Policy Update… to apply the updated GPO to all Active Directory (AD) objects in the OU.
The settings will now be reverted for all systems and users they were applied to.