
I am a Zivver admin
Configure and manage Zivver
Install and configure the Zivver Chrome Extension
To use Zivver with Gmail, follow the steps in the specified order. These instructions explain how to install the Zivver Chrome Extension for Google Workspace as a Google Super Admin, allowing users to send and receive Zivver messages in Gmail.
Installation and configuration of the Zivver Chrome Extension
Setting up the Zivver Chrome Extension consists of two steps. Make sure to complete both steps to use Zivver with Gmail.
- Install the Zivver Chrome Extension
- Create a service account for the Zivver Chrome Extension
Before you begin, make sure that you meet the following technical requirements:
- Super Admin rights in the Google Cloud Platform Console and the Google Admin Console.
- Zivver administrator rights.
Install the Zivver Chrome Extension
Procedure
Log in with your admin credentials to your organization’s Google Workspace Google Admin Console.
Optional: You can make the Zivver extension available only to a specific group of users instead of your entire organization — for example, a specific team or pilot group. To do this, first create a new organizational unit (OU) and assign the relevant users to it.
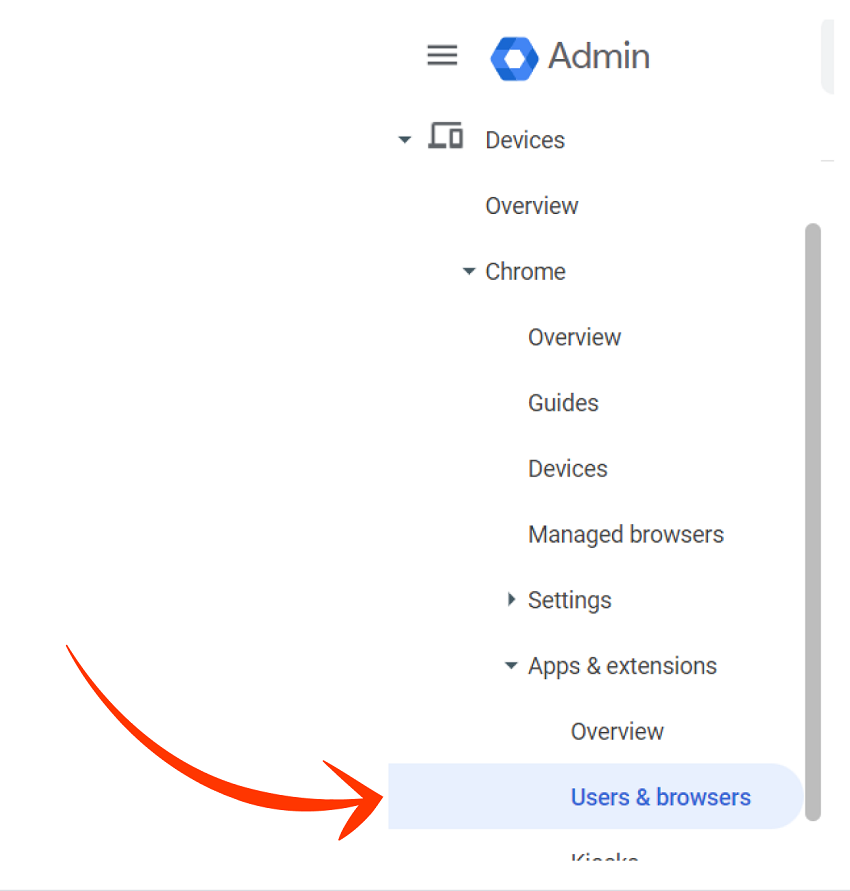
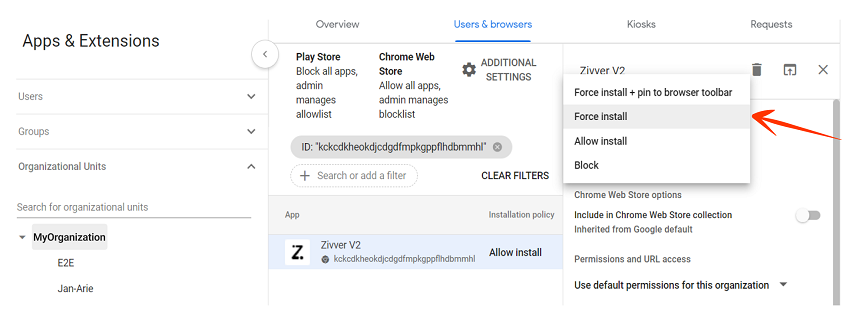
From the navigation menu on the left, go to Devices > Chrome > Apps & Extensions > Users & Browsers.
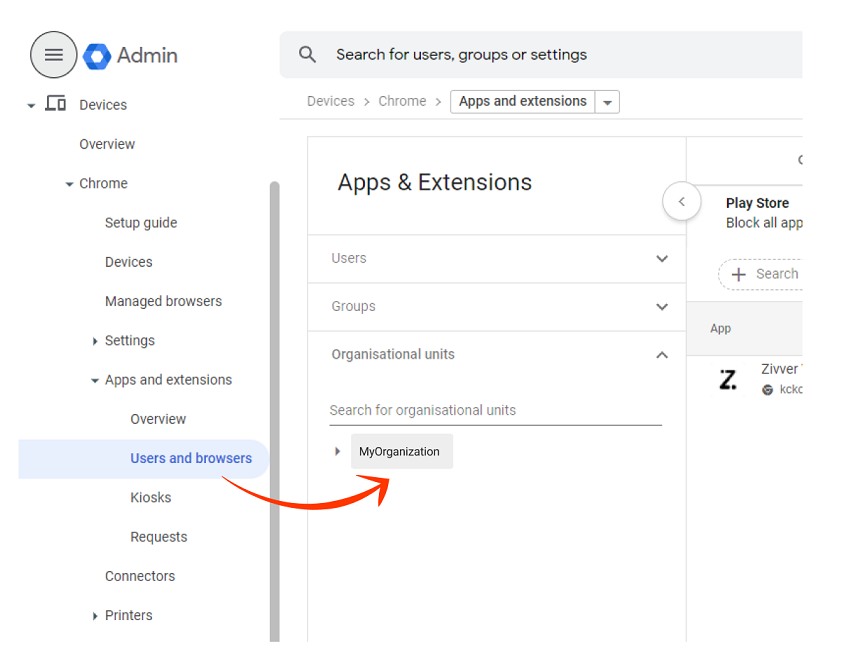
Select the OU to which you want to assign the extension.
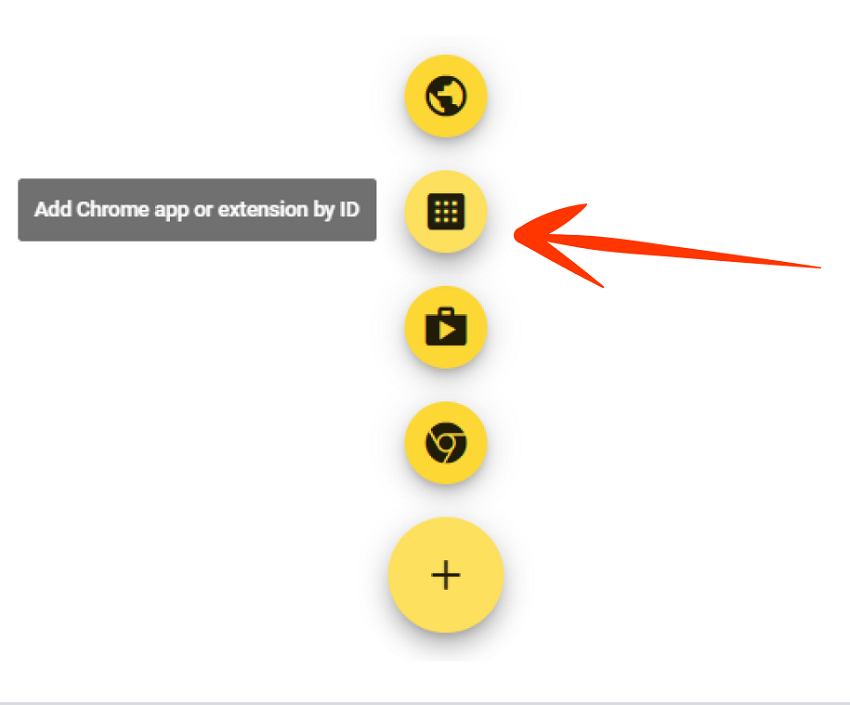
Hover over the + icon at the bottom-right corner and select Add Chrome app or extension by ID.
Enter the ID of the Zivver extension:
kckcdkheokdjcdgdfmpkgppflhdbmmhl. Then click .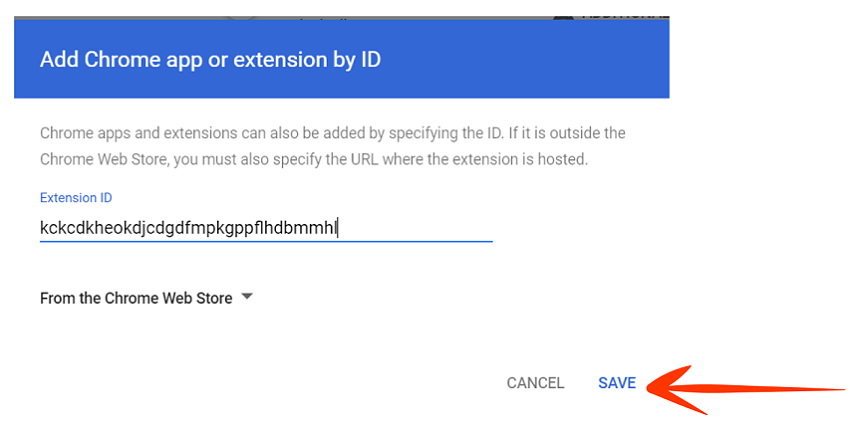
Zivver will now appear in the list of installed apps and extensions.
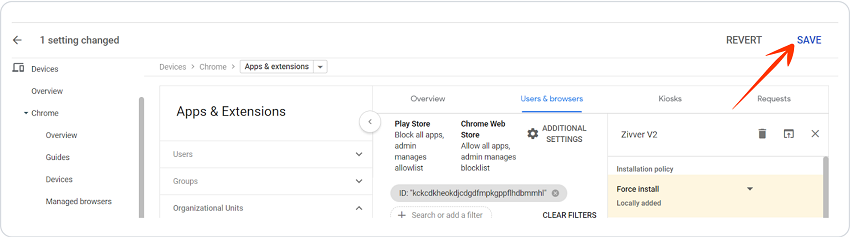
Change the installation policy. Use the dropdown menu on the right to select Force install.
Click in the top-right corner.
What to do next
Continue with Create a Service Account for the Zivver Chrome Extension. This is a critical step for the extension to function.
Create a service account for the Zivver Chrome Extension
After installing the Zivver Chrome Extension, create a service account to grant access to your users.
You must have a Google Workspace account to use the Zivver Chrome Extension.
Create a project
Technical requirements
- Super Admin rights on the Google Cloud Platform Console and Google Admin Console
- Zivver administrator rights
Procedure
Go to the Google Cloud Platform Console and sign in.
Click your organization’s name at the top of the screen.

In the pop-up that appears, click .

Give the project a name that fits its purpose.
The fields Organization and Location must contain the name of your organization.
Example: ZivverClick Create.
You have now created a project. The project dashboard will appear.
Enable Gmail API for the project
Procedure
Select this project in the dropdown next to the Google Cloud icon.

In the left panel, go to APIs and services > Library.
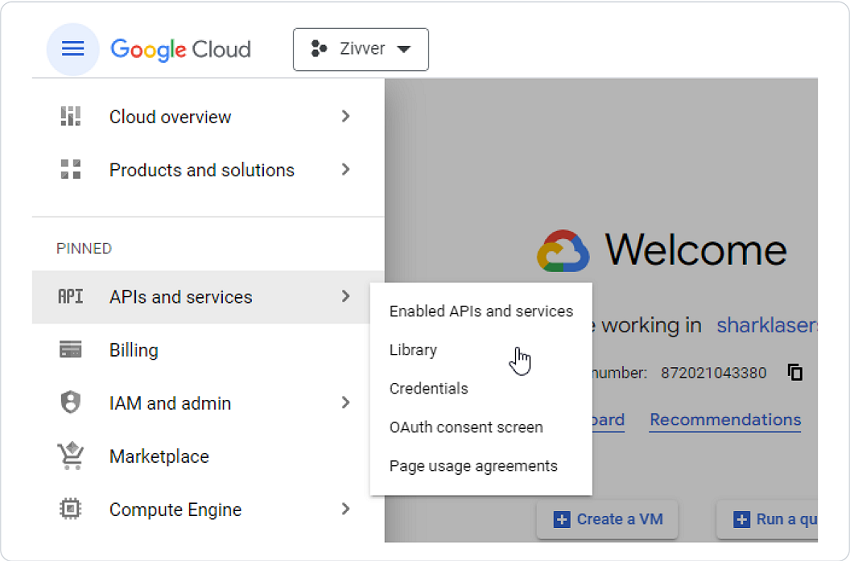
Enter Gmail API in the API Library search bar and select it from the list.
You will be redirected to the Gmail API landing page.Click .
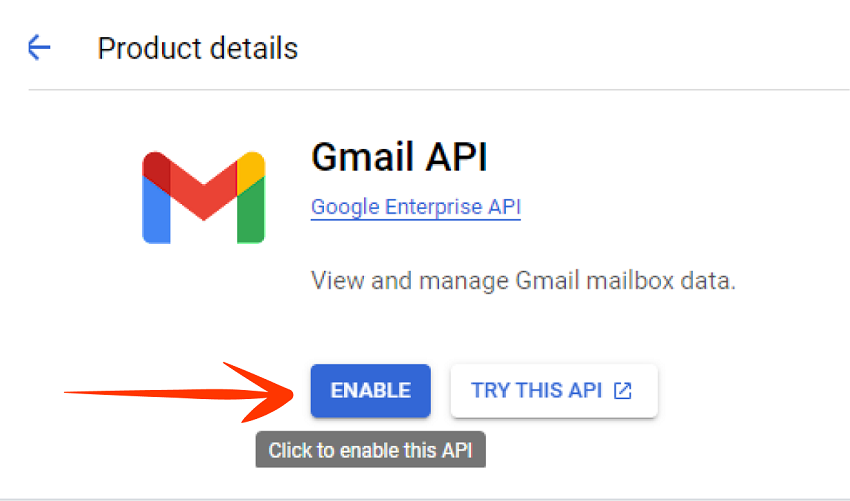
You have now enabled the Gmail API for your project.
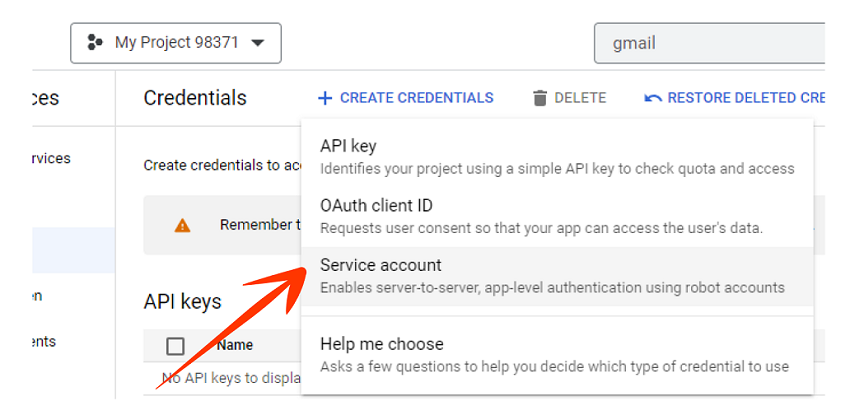
Create the service account
Go to Credentials and click .
In the dropdown menu, select Service account.
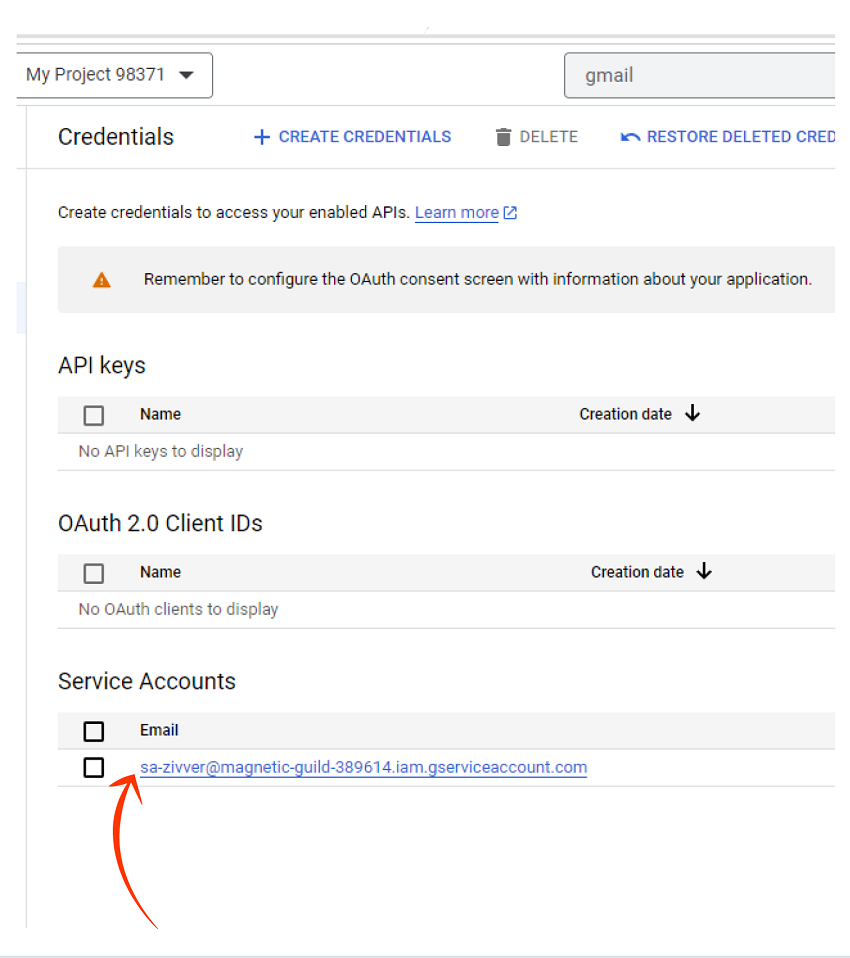
Give the service account a descriptive name.
Example: ZivverClick Done.
The service account will appear at the bottom of the screen with an email address that ends withgserviceaccount.com.Click on the email address for the service account.
Go to the Keys tab, then click .
 TipIf you have trouble creating a new key, your account probably does not have the required permissions. See Modify Google Cloud Policy for instructions on how you can grant your account the required permissions.
Select Create new key.

A popup will appear asking you to select the key type.
- Choose the JSON key type and click .
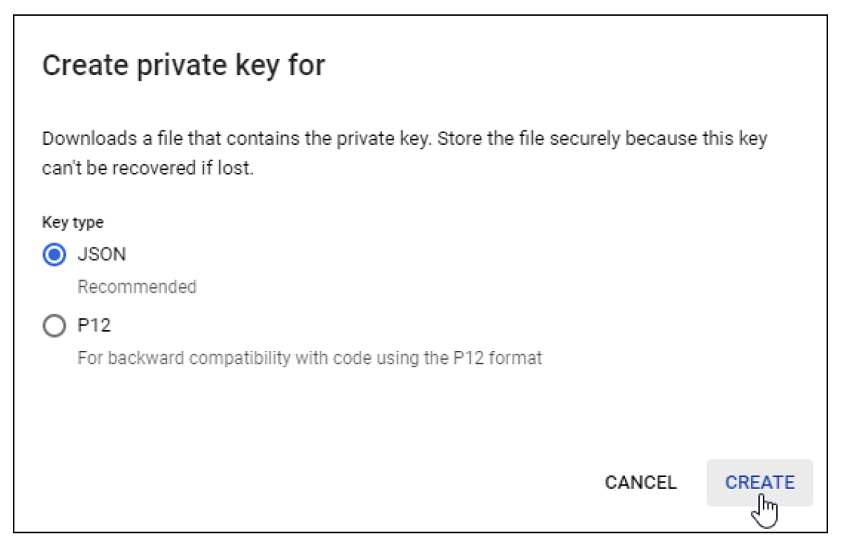
You will be prompted to save the private key in a JSON file.
After creating the service account, you will generate a key to access this service account and your Gmail environment. You will only need the key once unless you accidentally remove it in Zivver.
The key is stored in a JSON file, and Zivver encrypts that file. However, neither Google nor Zivver allow you to download the file again, so make sure to store the file in a secure location where only authorized persons can access it.
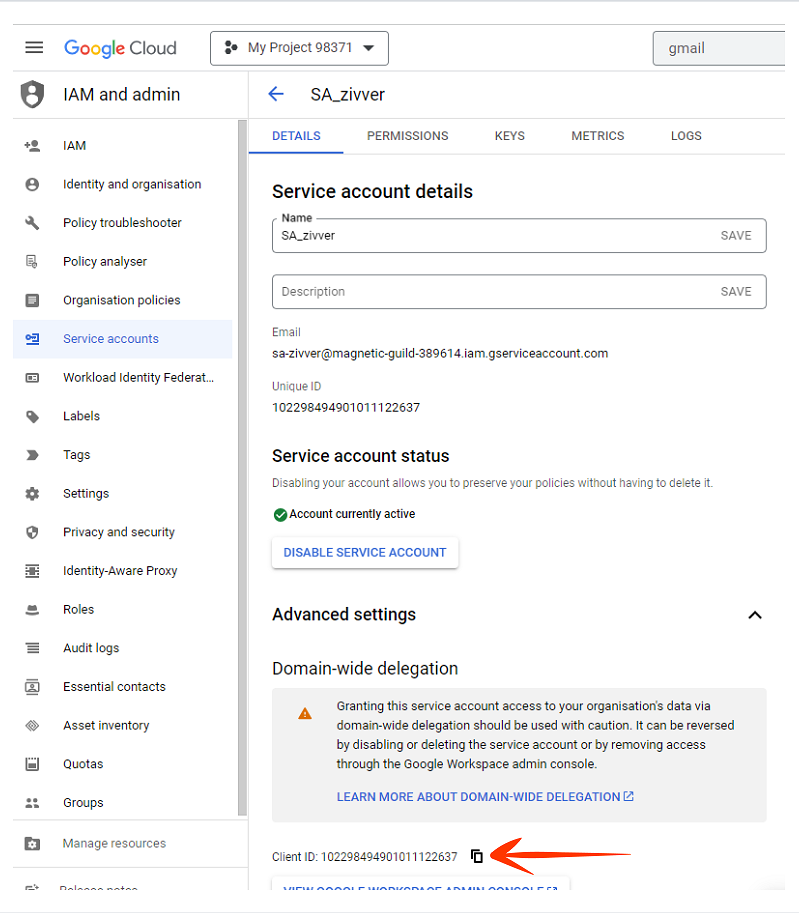
Still on the Service account details page, click Advanced settings.
Copy the Client ID.
What to do next
Use the Client ID in the next section.
Connect the service account to the Google Workspace environment
Before you begin
You copied the client ID to the clipboard of your operating system. Please refer to Create the service account.
Procedure
Go to the Google Admin Console.
Click Security > Access and data control > API controls.
Click .
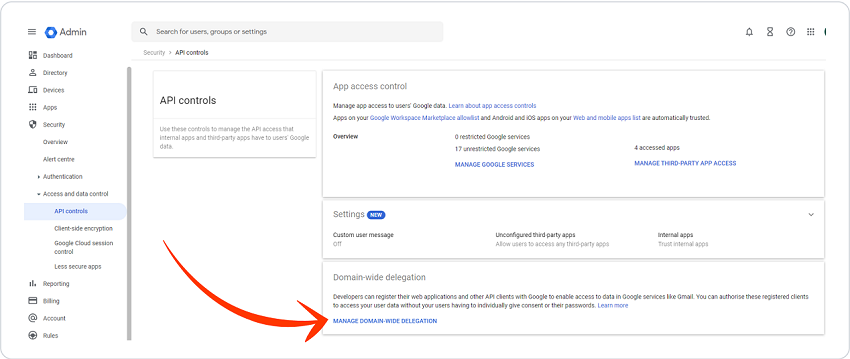
Click Add new.
At Client ID, paste the client ID that you copied.
At OAuth scopes (comma-delimited), write this:
https://www.googleapis.com/auth/gmail.insertClick AUTHORIZE.
You now set API permissions for the service account.
Troubleshooting
Configure the service account key in Zivver
Procedure
Go to the Google workspace settings page in the Zivver WebApp.
Open the JSON file from the service account section in a text editor on your computer.
Click .
Paste the full content of the file in the text box at Google Workspace Service Account Key.
Click .
The text box then disappears for security reasons. You now only see the and buttons. Do not use these buttons, unless, for example, you migrate to a different Google environment.If you see the orange warning
 There are x user(s) that cannot access the service key. As a result, they will not be able to use the Chrome Extension for Gmail., click .
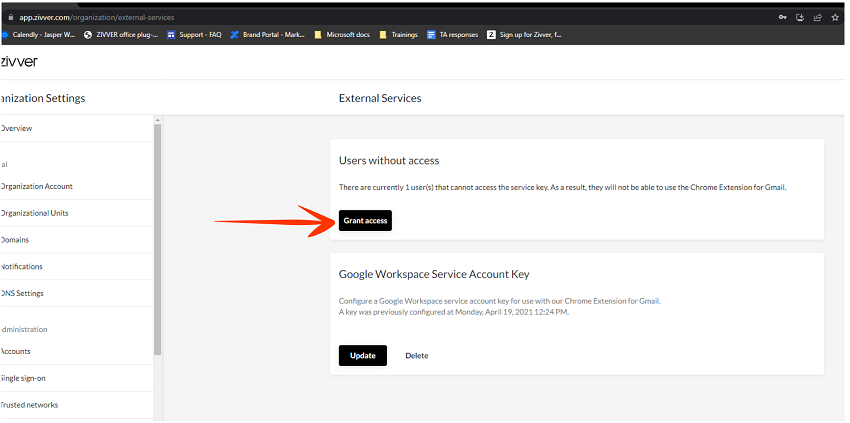
Then, all the users can authenticate with the Service Account key. InfoYou need to grant access to the service key for every account that is manually created in Zivver.
Users created with the Zivver Synctool are automatically granted access to the service key, so no additional action is required for them.
Your Zivver Chrome Extension (when deployed) is now ready to use.
Grant access to the Zivver Chrome Extension
About this task
If you created a user without the Zivver Synctool, you must grant them access to the Zivver Chrome Extension on the Google workspace settings page. Users without access see this message in the Zivver pane in Gmail:Zivver is not set up correctly, speak to your administrator
Procedure
- Go to the Google workspace settings page in the Zivver WebApp.
- Click in the orange warning There are x user(s) that cannot access the service key. As a result, they will not be able to use the Chrome Extension for Gmail..
After a page refresh, the users can use the Zivver Chrome Extension.